
Activity 3. EXPLORING & RESPONDING dimension
Lesson Topic/Focus: Features of a Chameleon
AusVELS Domain(s): The Arts
AusVELS Dimension(s): Exploring and Responding
Grade/Year Level: Grade 2
Duration of lesson: 60 mins
LEARNING OUTCOMES/STANDARDS
- Students will be able to identify key features of a Chameleon; their eyes, tails and their hands when looking at artworks.
- Students will be able to explore the technique they believe the artist to have used in their artwork.
- Students will be able to respond creatively by using a similar style to the artist and
___________________________________________________
ASSESSMENT CRITERIA
- Students comment on the exploration, development and presentation of others artworks, including the use of specific arts elements, principles and/or conventions, skills, techniques and processes
- They identify and describe key features of arts works from their own and other cultures, and use arts language to describe and discuss the communication of ideas, feelings and purpose in their own and other people’s arts works.
____________________________________________________
PRIOR KNOWLEDGE
This is the second art lesson on the Chameleon Colours topic. However, students have been learning about Chameleons as a part of their science unit of work. They are aware of their skin changing colours, however they have not yet focused on other key features of a Chameleon.
______________________________________________________
MATERIALS
· Interactive whiteboard
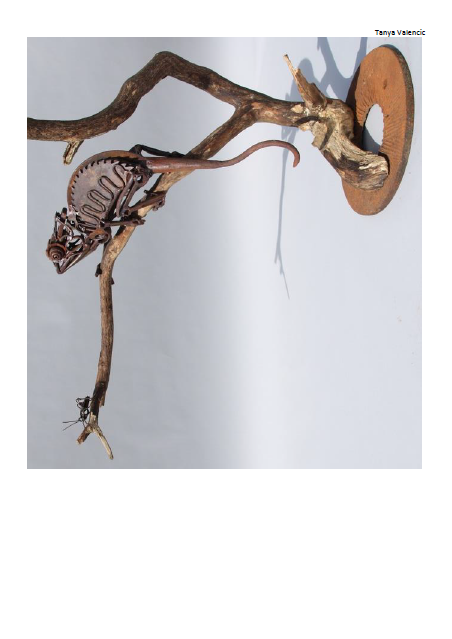
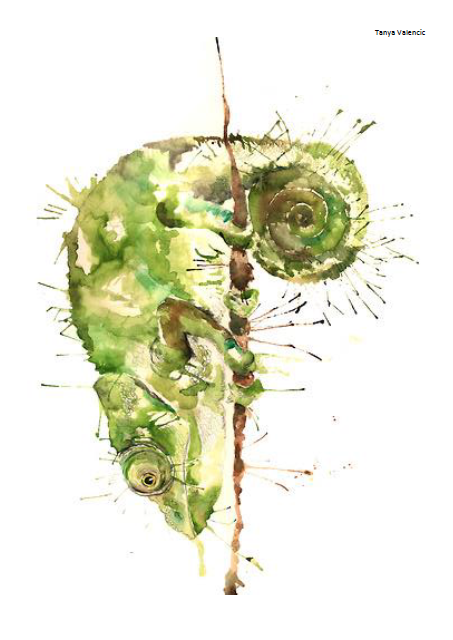
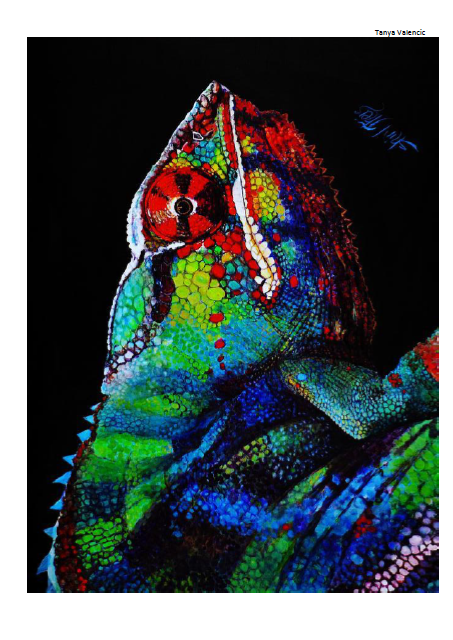
· Pictures of Chameleon artworks- printed up so there is a few per table
(see bottom of page)
could really use any artworks you believe to be suitable
· Grey lead
· Coloured pencils
· Worksheet (see bottom of the page)
· Hole punchers
· Scissors
_______________________________________________________
INTRODUCTION
Before showing students pictures briefly talk about what they have learnt about Chameleons so far. What is special about Chameleons etc.
_______________________________________________________
DEVELOPMENT
Show students first picture using VTS to facilitate discussion
- What's going on in this picture?
- What do you see that makes you say that?
- What more can we find?
Try to also get the students to talk about how they think the artist has drawn the image
(or what they have used to create the 3D artwork)
Try to use language like: feature, focus, focal point, shape, texture and space as you want the students to look at what and how the artist has made particular features of the Chameleon/s stand out.
Repeat this process for another two pieces of artwork
(if not using the ones provided make sure they all have different features or use different materials).
_______________________________________________________
CONSOLIDATION AND PRACTICE
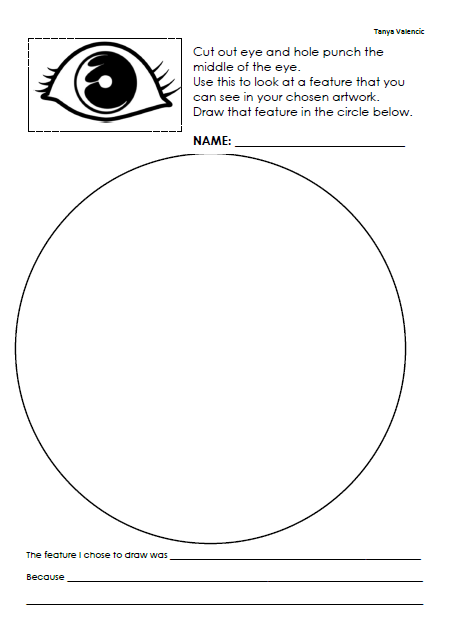
Hand out worksheets to students and give them instructions of what to do with the ‘eye keyhole’ template. Explain that they have to cut it out and then hole punch the middle of the eye- model this for them.
They will then choose one of the artworks that we had discussed in class and use the eye hole to look at a particular part of the Chameleon in that artwork.
Example, the eyes, the tail, the skin of the Chameleon etc.
They have to then draw a part of that feature and write what they had decided to focus on and why.
_______________________________________________________
CLOSURE
Get students to pack up what they’re doing and gather on the floor.
I will get a few students to share with the class what they decided to focus on and why. And as a class we will have a quick discussion about what they have learnt about Chameleons from viewing the different artworks.
AusVELS Domain(s): The Arts
AusVELS Dimension(s): Exploring and Responding
Grade/Year Level: Grade 2
Duration of lesson: 60 mins
LEARNING OUTCOMES/STANDARDS
- Students will be able to identify key features of a Chameleon; their eyes, tails and their hands when looking at artworks.
- Students will be able to explore the technique they believe the artist to have used in their artwork.
- Students will be able to respond creatively by using a similar style to the artist and
___________________________________________________
ASSESSMENT CRITERIA
- Students comment on the exploration, development and presentation of others artworks, including the use of specific arts elements, principles and/or conventions, skills, techniques and processes
- They identify and describe key features of arts works from their own and other cultures, and use arts language to describe and discuss the communication of ideas, feelings and purpose in their own and other people’s arts works.
____________________________________________________
PRIOR KNOWLEDGE
This is the second art lesson on the Chameleon Colours topic. However, students have been learning about Chameleons as a part of their science unit of work. They are aware of their skin changing colours, however they have not yet focused on other key features of a Chameleon.
______________________________________________________
MATERIALS
· Interactive whiteboard
· Pictures of Chameleon artworks- printed up so there is a few per table
(see bottom of page)
could really use any artworks you believe to be suitable
· Grey lead
· Coloured pencils
· Worksheet (see bottom of the page)
· Hole punchers
· Scissors
_______________________________________________________
INTRODUCTION
Before showing students pictures briefly talk about what they have learnt about Chameleons so far. What is special about Chameleons etc.
_______________________________________________________
DEVELOPMENT
Show students first picture using VTS to facilitate discussion
- What's going on in this picture?
- What do you see that makes you say that?
- What more can we find?
Try to also get the students to talk about how they think the artist has drawn the image
(or what they have used to create the 3D artwork)
Try to use language like: feature, focus, focal point, shape, texture and space as you want the students to look at what and how the artist has made particular features of the Chameleon/s stand out.
Repeat this process for another two pieces of artwork
(if not using the ones provided make sure they all have different features or use different materials).
_______________________________________________________
CONSOLIDATION AND PRACTICE
Hand out worksheets to students and give them instructions of what to do with the ‘eye keyhole’ template. Explain that they have to cut it out and then hole punch the middle of the eye- model this for them.
They will then choose one of the artworks that we had discussed in class and use the eye hole to look at a particular part of the Chameleon in that artwork.
Example, the eyes, the tail, the skin of the Chameleon etc.
They have to then draw a part of that feature and write what they had decided to focus on and why.
_______________________________________________________
CLOSURE
Get students to pack up what they’re doing and gather on the floor.
I will get a few students to share with the class what they decided to focus on and why. And as a class we will have a quick discussion about what they have learnt about Chameleons from viewing the different artworks.
This website was created by Tanya Valencic. Last updated 2013.
